Sunday, May 5, 2013

Basmati Coconut Rice with Fried Chicken and Fish Flakes


My love affair with South East Asian cuisine dates back to summer 2003; the day I had my very first taste of the almighty Malaysian Rendang Curry. Remember that scene in Ratatouille when Remy was trying to enhance his brother's palette by using music and fireworks to explain food? Well mine was just like that! Only instead of Remy, it was a fussy Malay chef going "Makan! Makan! You're going to love it!" 

Since then Malaysian, Indonesian and sometimes Thai food have cemented a place in my heart and most importantly in my diet. I hardly go a week without my favourite recipes and if i had my way, i'll totally open a Malay style restaurant in Abuja. Wouldn't that be amazing? It'll be an earthy style, dimly lit space and we'd serve proper Malay curries, Exotic recipes from Ipoh and Melacca. And even Pasar Malam style street food, satays and all the different type of Roti! My fave is Roti Tissue and I have promised myself that one day, I, UmmiBee of Daura, will master the art of Roti Tissue making.

I came up with this recipe when i was craving Nasi Lemak so badly and I wanted something a bit more exciting and filling... so why not take it to the next level? Used Basmati rice and I incorporated the fried chicken into the rice instead of serving separately... In the absence of ikan bilis (fried anchovies) i made fish flakes. Though deep down in my heart, I know nothing can ever replace ikan bilis... *sigh*
Enjoy this straight forward and spicy coconut rice recipe :)

Coconut Rice with Chicken and fish flakes


What goes in!

2 cups of basmati rice
250ml coconut milk
½ kg uncooked chicken
1 medium onion, chopped
1 chilli (atarugu), chopped
½ tsp of cumin
2 cloves of garlic
¼ cup of oil
1 tablespoon crayfish, ground
½ tsp thyme or Rosemary
3 cubes maggi seasoning
Salt and pepper

Fish Flakes (optional)
3 small tilapia fish, beheaded, cleaned
1 cube maggi seasoning
½ tsp chilli powder
A pinch of salt


Here’s how it goes!
                   Wash the basmati rice and soak in water for at least 30 minutes.

                   Place the chicken, maggi seasoning, thyme and some salt into a pot. Add half a litre of water and boil for 30 minutes. Remove the chicken from the pot and reserve the stock.
                   Separately, boil the fish in a pot of 250ml water with the salt and one maggi cube for 10 minutes. Remove and leave the fish to cool.
                   Heat oil in a large pot and fry the pieces of chicken until browned. Remove the chicken and set aside.
                   Add the onions to the oil and stir for abut 3 minutes. Add in the garlic, chilli, cumin and crayfish and stir fry for two minutes.
                   Strain the rice and add it to the pot. Stir fry for 3 minutes until the kitchen is filled with fragrance.
                   Add the coconut milk to the pot. Stir and cover for 2 minutes.
                   Then add the fried chicken and the chicken stock to the pot and cover. Taste, and adjust the seasoning if necessary. Check on it every 5 minutes until the basmati rice is well cooked (in my experience this usually takes 8 – 15 minutes max!). If the water gets used up before the rice is cooked, feel free to add more water, half a cup at a time.
                   Meanwhile, remove all the bones from the fish and shred into tiny pieces with a fork. Heat up 1 tablespoon of oil to a frying pan. When it’s hot enough, add the fish and season with the chilli powder and salt. Stir until it is dry and crispy.
                   Serve the rice and chicken warm and sprinkle the fish flakes generously on each plate. You’re done! Bon appetit.


Wednesday, May 1, 2013

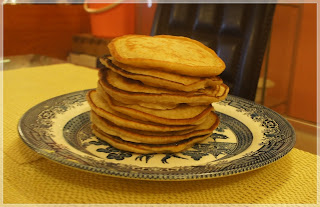
Strawberry Pancakes!

Who doesn’t love good old diner style pancakes, smothered in honey syrup and served up with fresh fruits in season?  Follow this super easy recipe to recreate this warm, timeless favourite!


Before marriage, my relationship with Mr. H was long, long, long distance for like 9 years! So in order to keep the fire alive, we tried as much as possible to include each other in our daily lives for as many hours a day as we could. We’d even try to eat the same meals as much as possible J. One faithful day, I had just had pancake for Iftar and of course, he wanted some too. So I invented this super easy, fail-proof, bachelor-friendly pancake recipe and we’ve been using it since then…
I call it the “Rule of one” 


What goes in
For the pancake base
-          1 large egg
-          1 cup of flour
-          1 cup of milk
-          1 tsp baking powder
-           
-          I call it the “Rule of one”

This is all you need for your fluffy pancake batter. Of course you need to add lots of extras to make it special

Other ingredients
-          3 – 4 tbsp of sugar or splenda
-          ½ tsp of mixed spice or cinnamon powder
-          2 tbsp of Desiccated coconut
-          A tiny drop of butterscotch flavor
-          A pinch of salt


Here’s how it goes

-          Sift the flour, salt, baking powder and cinnamon powder into a big wide bowl
-          Make a well in the middle and crack the egg in
-          In a separate container, dissolve the sugar in the milk
-          Add the butterscotch
-          Combine until a thick runny batter is formed
-          Leave batter to sit for about 5 – 10 minutes
-          With oil or butter, lightly grease a non-stick frying pan and place on medium heat
-          Spoon pancake batter unto frying pan with a ladle
-          After about 1-2 minutes or when bubbles start forming on the back, flip the pancake. The fried side should be a nice brown colour. Fry the bubble side briefly for 30 seconds to 1 minute.
-          Repeat until all the batter is finished


Setting up
-          By now you should have a short stack of hot pancakes. Set aside
-          Wash your strawberries thoroughly and remove the leaves and blemishes (If any).


-          Serve pancakes in stacks. Top with fresh strawberries and a drizzle of syrup or honey.

You can also serve it as a dessert with a scoop of ice cream or a dollop of whipped cream…mmmmmm! #yummz


P.S: How amazing do those strawberries look? My brother bought a whole stash for me from Jos. They are all super fresh and home grown and they are sold in recycled indomie boxes on the highway between Jos and Abuja. Got about 800grams for 500 naira! That’s a bargain considering I get 250 grams of unripe, sour fake ones for 1200naira from Shoprite! Grrrr!
Anyways, enjoy your strawberry pancakes.
Lots of love!
UmmiBee

P.P.S: Have your own special pancake recipe? OR want to try this at home? Please send in your recipes with photos! We all love to share


Friday, January 11, 2013

Beauty: Get perfect skin with turmeric! (Curcur scrub)


People see my wedding photos and say, “Wow! Your skin was so fresh then, what happened now?” At that point, I’d be like “Dude, haven’t you heard of photoshop?” But no matter how much credit I give makeup and photoshop, I know there’s one component that deserves some praise as well, and that is the turmeric scrub, aka Curcur.


I first came across the turmeric facial during the “gyaran jiki” phase of my wedding prep. For my non-Hausa friends, “Gyaran Jiki” literally means “fixing the body” and in the context of a wedding, its a series of body treatments the bride has to go through so she can look super glamourous during her wedding. I know what you’re thinking, and no, I’m not talking about bridalplasty. This is more like body scrubs, perfumes and other edible stuff which I won’t go into right now. So we pretty much do gyaran jiki to look (and smell) good. I used this scrub every morning for 3 weeks prior to the wedding.

Since returning to Naija I have noticed it is fast becoming very common practice among Hausa people, even though we borrowed it from the Kanuri people, who borrowed it from Sudanese people, who may have been influenced by Indians. Suffice to say, it may be borrowed but its here to stay cos its pretty damn good!


I hated it at first. Why? Cos I was FORCED to get it done before my wedding. FORCED! Against my will! By my Mum! So I had to hate it at first, just to spite her :) :) but I eventually gave in.

I was skeptical for 2 reasons.

How can a spice that I add in to curry magically transform my skin? What is the evidence base for this practice? Is it on PubMed?
Even if it works, why should I do it? I like my skin just the way it is. I mean, sure the Australian sun might have battered it a little, but its nothing my St. Ives lotion and SPF 30 can’t fix. I don’t want to be one of those brides that have beautiful dark skin and then suddenly go all li’l Kim at their wedding!

Anyhow I was wrong, turmeric doesn’t bleach the skin (thankfully!) but when used regularly, it does give soft, acne-free skin and a yellow undertone that gives the illusion of a glow and then gradually fades out after a few weeks. Kinda like what henna does with red, although unlike henna, turmeric isn’t as pigmented and in most people, you don’t really see a difference in skin colour, only soft and luminous skin.

After suffering in Ibadan, I realised my skin was in a dire SOS mode so why not recreate it? Only this time I wasn’t going to buy the premixed scrub, but make it myself. I twisted the arm of my aunt who makes these for a living and she let me in on the formula for the Curcur scrub. It’s easy and most of the stuff you already have at home!  


Here’s what I used


The quantities can vary according to your needs. If your skin is too dry, add more oats! If you are fast tracking like me, add extra turmeric. Just make sure you don’t put too much lemon/lime juice cos its acidic.

Main Ingredients
Turmeric - 2 tablespoons
Honey - 2 tablespoons
Yeast - 1 tablespoon
Lemon or lime juice 1 tablespoon


Optional 
Oats - 2 tablespoons
Humrah - a dash (Traditional perfume, I used pineapple flavour)
Lotion - enough amount to last me a week.
Plain flour - if consistency is too runny, add flour, one teaspoon at a time to make a thick paste.


Extras
Mixing bowl and spoon
Deep pore cleanser 
Sunscreen
Perfume

Here’s what to do


  1. Pour all the dry ingredients into the bowl and mix them
  2. Then pour the lemon juice and honey and mix to a paste
  3. Add lotion to your desired quantity, make sure you add just enough and not too much otherwise your scrub will be runny.
  4. Add a dash of non irritating perfume (humrah, cologne, eau de toilette or body mist) to the scrub (optional)
  5. If your paste is too runny, you can add plain flour, one teaspoon at a time and mix thoroughly till you get the desired consistency.
You’re ready to use!


How to use it on the face


  1. First, I make sure I’ve washed my face thoroughly with warm water 
  2. Then I smear small amounts of the scrub to my face and work it in firm circular motions until every surface is covered.
  3. I wait 30 minutes or until the scrub dries and then I rub it off in firm circular motions to get an exfoliating effect.
  4. When its all off, I wash it off. First with water and then with a nice deep pore cleanser.


How to use on the whole body

  1. Take a shower to wash the body thoroughly then blot with a towel and make sure you’ve dried completely.
  2. Stake out an area where you’ll stay and cover the floor with old newspapers or plastic sheets or just go to a tiled area that can be cleaned easily.
  3. Wear no clothes! Just tie an old towel, or an old wrapper or just laze around in the buff. Whatever you choose, don’t wear clothes or they might get stained. 
  4. Work small amounts of the scrub all over the body surface in circular motions until everywhere is covered. You can ask someone to help you with the hard to reach areas.
  5. Leave the scrub on for about 30 minutes or until its completely dry. It may start crumbling off when its dry, so its best to remain within the news-papered area.
  6. When dry, go to a bath tub or shower. Start rubbing off the scrub in circles. This will have an exfoliating effect.
  7. When its all off, have a shower with warm water and use a sponge to wash off any left over scrub.
  8. Use humrah or a perfumed lotion all over body to mask any odours that may linger.
That's it! I usually avoid the sun when I'm using this scrub but when i have to go out, I use sunscreen SPF 30. Enjoy fresh blemish-free skin! Thank me later :)